How to Build Custom eLearning Interactions in Articulate Storyline Using AI and Web Objects
Learn how to use the Articulate Storyline Web Object feature with AI to build custom, responsive web apps and advanced interactions without coding.
Let’s be honest for a second. We are all waiting for Articulate Storyline and traditional eLearning authoring tools to get replaced by something better. In the meantime, Articulate keeps pushing new AI features that most instructional designers did not ask for and do not really need.
Please, stop using AI just to rewrite your learning objectives. Stop arguing about whether AI produces low-quality content.
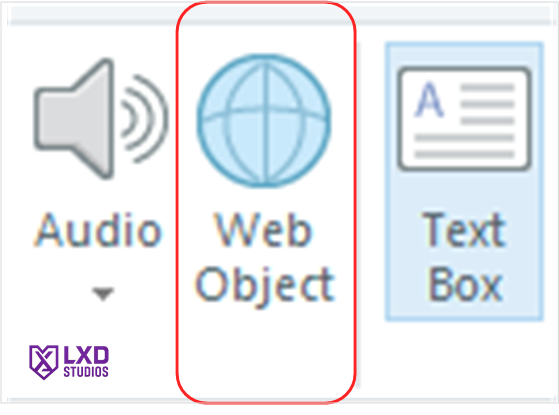
Instead, let’s talk about the most powerful tool in your eLearning development toolkit that almost nobody uses. It sits right on the top menu, right between the Audio and Text Box buttons.
The Articulate Storyline Web Object button.
What it does on the surface is simple. It lets you embed a website into your slide. You probably knew that already.
What you might not know is that a web object does not have to be an existing website that someone else built on the internet. You can build your own custom mini-website completely from scratch right on your computer.
When you pair a local, custom-built web object with modern AI, your eLearning software limitations instantly disappear.
Moving Beyond Fake eLearning Interactivity
Think about the classic confidence check slide we have all built a thousand times. You ask the learner, "How confident are you in this topic?" and give them a slider. The learner moves the slider, clicks submit, and the course moves to the next slide. The next slide is exactly the same no matter what the learner chose.
It is an illusion. It is fake interactivity.
Now imagine a different scenario. What if that confidence check was a dynamic dashboard?
As the learner moves the slider, the background smoothly changes color. It immediately creates a personalized list of topics they need to focus on. It uses smooth custom web animations that Storyline cannot do natively.
Even better, you can hook that web object up to your Storyline variables using simple JavaScript.
You can have them take that confidence check at the very beginning of the course. As they go through your regular Storyline slides, your variables quietly update in the background. At the very end of the course, you load that exact same web object dashboard again.
Now, the learner sees a dynamic, side-by-side comparison of where they started versus how they actually performed. It is a completely personalized report card built on the fly.
Step-by-Step Guide: How to Insert a Local Web Object in Storyline
You do not need to be a web developer or know advanced coding to do this. You just need to know how to ask AI for the right HTML and CSS code. If you are an eLearning developer using this feature for the first time, here is exactly how to create your first custom web slide.
Step 1: Create a Local Project Folder
Create a brand new, empty folder on your computer. Name it something simple and recognizable, like my-web-slide. This folder will hold your interactive file.
Step 2: Generate the Code with AI
Copy the custom prompt from the practical activity section below. Paste it into an AI tool like ChatGPT, Claude, or Gemini. The AI will generate a single block of code for you.
Step 3: Save Your HTML File
Open a simple text editor on your computer, like Notepad on Windows or TextEdit on a Mac. Paste the code from the AI into the text editor. Save the file inside your new folder. You must name the file exactly index.html.
Step 4: Insert the Web Object into Storyline
Open your Articulate Storyline project and go to the slide where you want the interaction to appear.
- Click the Insert tab at the top ribbon.
- Click the Web Object button.
- Click the small folder icon next to the address bar.
- Browse and select the local folder you created in Step 1.
- Click OK.
When you preview or publish your course, Storyline automatically packages this folder. It will run completely offline, right inside your slide container.
eLearning Developer Activity: Your First AI Web Slide Prompt
Ready to try it? Let's build a clean, custom slider that acts like a modern web app. Since this will sit inside a Storyline slide, the code needs to fit perfectly without causing ugly browser scrollbars.
Copy and paste the exact prompt below into your favorite AI tool to get started.
AI Prompt for eLearning Web Object: Create a single-file web application for an interactive learning slide. It must be fully self-contained in a single
index.htmlfile containing all HTML, CSS, and JavaScript.Design Constraints:
- It must be optimized for a standard landscape eLearning slide size with a 16:9 aspect ratio (use 960 width by 540 height as a baseline).
- The background should be a modern, clean light gray.
- Use a modern sans-serif font like Arial or Helvetica.
- Hide all default browser scrollbars using CSS. The content must fit perfectly within the dimensions.
Slide Features:
- Add a centered title at the top: "How confident do you feel about this topic?"
- In the center, create a large, styled HTML slider input ranging from 1 to 3.
- Below the slider, create a dynamic text area that changes based on the slider position.
- If the slider is at 1, the background smoothly transitions to a soft red, and the text says: "Let's start with the basics."
- If the slider is at 2, the background smoothly transitions to a soft yellow, and the text says: "Great, we will practice your skills."
- If the slider is at 3, the background smoothly transitions to a soft green, and the text says: "Excellent, let's test your advanced knowledge."
Please provide only the complete code inside a single code block.
Once the AI gives you the code, follow the step-by-step guide above to import it into Storyline. You will instantly see how much smoother, faster, and more dynamic your custom eLearning courses can be.